Dormouse Title Image Comparison

Tutorial: Frame-by-Frame Aesthetics in After Effects

After Effects is a great program when it comes to creating 2D animation. Although if you want to create something that resembles good old traditional hand-drawn animation, you quickly reach your limits. With two little tricks however it is possible to imitate this old-school cartoon aesthetic. You don't even have to be good at drawing.

Dormouse after

Before: A looping animation without further effects. Cute.
Dormouse before

After: Much better! Cartoon aesthetics at its best.

Warning: To explain this effect, I will dive a little deeper into the matter. If you don't feel like it, or just want to experiment yourself, you can download a small sample project here. Enjoy!

Okay, now we've lost everyone with a short attention span. For those who haven't run away yet: Hello! to create a hand-drawn animated film aesthetic, you should pay attention to two things: The frame rate and - because I can't think of a better word - the shape.

Part 1: The Frame Rate

Without going into too much detail, it can be said that 24 frames per second (fps) are a common standard in today's film industry. Large-scale animated movies by Disney and similar companies usually work with this frame rate. Such productions - considering that every picture has to be drawn by hand - cost a lot of time and therefore a lot of money. There is a reason why the profession of the "Inbetweeners" was invented, so that the main animators' arms wouldn't fall off from exhaustion.

Smaller productions such as the Teenage Mutant Ninja Turtles cartoon series did not have as big of a budget and therefore had to be produced much faster and cheaper. What is the easiest way to save costs? You just draw way less images. That's why classic Saturday morning cartoons were produced "on twos" or even "on threes". In other words: out of 24 frames per second only every 2nd, 3rd or even 4th frame was drawn. This reduced the frame rate considerably, without compromising the movement.

One Punch Man Framerate Comparison

About a second from the Anime "One Punch Man". So many frames!
Dragonball Z Framerate Comparison

Approximately one second from "Dragon Ball Super". It... works.

As you can see, this difference is clearly noticeable, which is why we want to use it for our effect. So how can we reduce the frame rate in After Effects? 

One possibility is to simply adjust the frame rate directly in the composition and work that way. But since I'm a fan of flexibility (and because working at 25 frames per second has burned itself into my brain) I personally prefer to use effects. Particularly the Posterize Time effect. With this effect you can define how many times per second the content of a layer is updated in After Effects. For example, if the original frame rate of a layer is 24 fps and you apply the Posterize Time effect with 6 fps to it, only every 4th image of the layer will be displayed.

This effect gives us the option to experiment and find out which frame rate suits our animation best. In the case of the sleeping mouse shown above, we have reduced the original frame rate from 25 fps by half (12.5 fps). Personally, I like to put this effect on a separate adjustment layer so that all layers below are affected equally.

When reducing the frame rate, you should always make sure that the most important details of the original animation remain intact. Fast movements (for example the blinking eyes of the sleeping mouse) can get lost between two frames. If everything fits, you can take care of the next part:

Part 2: The Shape

Animators are not machines. No matter how well they illustrate, they will never be able to create the same image twice. Conveniently, our eyes - or more precisely our brain - are easily deceived by similar looking shapes. Especially in the fast image sequence of an animation we make connections and unconsciously draw the conclusion that an object on a frame is also located on the next frame.

You never have to worry about that in After Effects. The animated elements are pushed, rotated, distorted, and manipulated in many other ways, but each frame is based on exactly the same initial shape. Your brain perceives something like this subconsciously, which prevents such animations from achieving the desired aesthetics of hand-drawn animations. So we need to make sure that the shape of the animation doesn't feel too perfect.

Cunstructed bouncing ball

The starting-point: A circle that jumps far too perfectly
Organic bouncing ball

The desired result: organic, inaccurate shapes

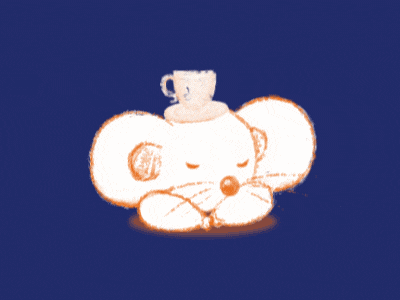
The solution: We distort the entire animation. This works best with the Turbulent Displace effect. This effect does exactly what it claims: it distorts the image in a turbulent way. If we use it discreetly, we get exactly the deformation we need. You have to experiment a little until you achieve the desired result. The values for the sleeping mouse shown above are:

Displacement: Turbulent
Amount: 7 
Size: 15
Complexity: 5

The distortion is already something, but it still looks exactly the same in every frame. To make each image look as if it had been drawn by hand, the distortion has to change significantly. To do this, we have to animate the Evolution parameter of the effect. This can be done by hand or - if you want to brag like crazy - with expressions! Just click on the stopwatch of the effect while holding down the Alt key and copy the following code into the text field:

time*3000 % 10000;

We multiply the current time by a very high value. This causes the distortion of each frame to change by a significant amount. However, since we would eventually reach the upper threshold of the Evolution parameter, % 10000 ensures that a value higher than 10000 is never reached. Instead, the expression starts counting from 0 again.

Finally, we have to make sure that this effect is not updated every single frame. In its current state, the animation would tremble and look very restless, which is obviously not the desired result. There are several ways to prevent this. One option would be to apply this effect above the Posterize Time effect, updating it at the same frame rate as the animation. This can work to varying degrees depending on the animation. If you want more flexibility, you can independently adjust the frame rate of the distortion itself instead. All you have to do is add one line to the existing expression:

posterizeTime(3);
time*3000 % 10000;

Thanks to the posterizeTime() function, the evolution of the effect is updated only three times per second. This frame rate worked very well with our sleeping mouse, however, it does not have to be used necessarily. As always: Do some experimenting!

Conclusion

You don't have to draw everything frame-by-frame to achieve a hand-drawn effect. Two small effects and a few (optional!) expressions lead to a result you can be proud of.


(Benjamin Hable)